Site map © Soft Byte Ltd 2012, 2025 Photos & screen shots are for illustrative purposes and may differ slightly from actual product.

Gallery
Diagonal Pintuck Sweater - by Loulou Pirotte
Sorry, the shape file is not available for download.
Size: petite (Bust - waist - hips: 88 - 68 - 88 cm)
Category: **
Machine: Brother KH970, electronic standard gauge.
Yarn: Linea Più Classico Mou, 2/28 Nm, 65% merino - 35% angora. 1 strand.
Total amount used: 400 grs.
Tension:
- Pintucks: 0 on both carriages, slide lever on II for FNR rows and 2 on both carriages, slide lever on I for the pintuck rows. (See ‘stitch pattern’ below).
- Circular rows: 0 on both carriages, slide lever on II.
- Full needle rib (cuffs): 0 on both carriages, slide lever
on II. - The close knit bar is used.
Gauge: 10 x 10 cm:
- Pintucks: 30 stitches x 140 rows
- Circular: 32.6 stitches x 150 rows (i.e. carriage passes).
- Full needle rib: 37.5 stitches x 75 rows.

Stitch Pattern before and after Cut and Sew


This project is entirely cut and sewn.
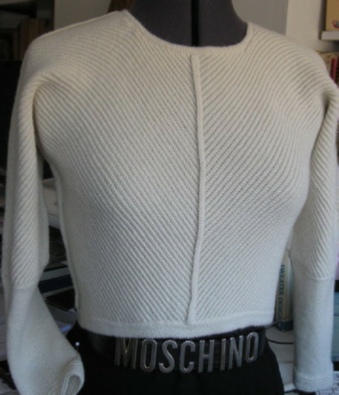
The picture on the left shows the pieces on the mannequin, with all the excess fabric that will be serged off.
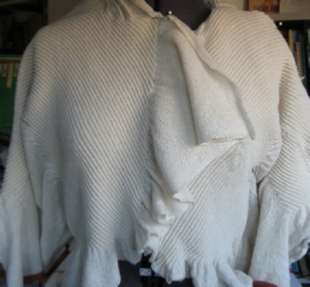
The picture on the right shows the result after serging off the excess fabric, and linking small circular bands to the serged off seams.
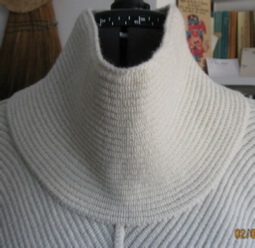
The picture below shows the collar. It is removable and, depending on how you place it, it can be worn ‘rounded’, as in the picture, or ‘pointed’. This is because of how its shape was constructed (see shape file).

Stitch pattern:
- Full Needle Rib needle set-up.
- One repeat of the pattern consists of 8 rows:
*2 rows in full needle rib (both beds) at tension 0 on both carriaqes with slide lever on II, followed by 6 pintuck rows (on one bed only), at tension 2 on both carriages, slide lever on I*. Repeat *-*.
- I designed a 6 x 8 pattern in Stitch Designer, using colour for the pintuck rows so that, while in Interactive Knitting, I would get the “Change 1” instruction when I needed to change the carriage settings.
- Knitting method: W
- Cut and Sew for textured patterns.
- Pintucks are a double-bed technique and can be knitted in 2 different ways:
- If you push in the 2 PART buttons on the main carriage, the ‘public’ side of the fabric will face you while knitting. The pintucks are formed on the ribber.
- If, instead, you push up the 2 PR buttons on the ribber carriage, the pintucks are formed on the main bed and the wrong side will face you while knitting.
I chose the second technique.
- To recap: knit 2 rows FNR, tension 0 on both carriages, slide lever on II, followed by 6 pintuck rows on the main bed, tension 2 on both carriages, slide lever on I and 2 PR buttons up on the ribber.
- Integrate stitch pattern and shape and use DesignaKnit 8’s Cut and Sew option: select a LMB colour that is not yet used in the pattern and choose LMB (RMB) colour and Fill Outside. The LMB colour will then be outside the piece.
- Be aware that, once you have integrated each piece with the stitch pattern for Cut and Sew, in Interactive Knitting, you will be knitting the stitch pattern (.STP) files, not the shape files (.SHP).
- Once in Interactive Knitting, you will notice your “swatch” (the .STP file you are knitting) looks elongated. When you knit a swatch (in this case cut and sew), the shape file tension is ignored, and it uses instead the default tension. (All stitch patterns that you open in Interactive Knitting just as swatches are shown with the default tension. But if you open a shape file and select an integrated piece, that will be shown with the shape file's tension).
- Hence: if you want to see the tensions shown accurately, make sure you select your actual tension before you start knitting your “swatch”: Interactive Knitting/Options/Tensions/Set from shape file.
Shape:
The shape was designed in Original Pattern Drafting.
The file has 9 pieces: Front tool, back tool, front, back, front 1 and 2, back 1 and 2, collar.
The cuffs and edgings, knitted separately, are not represented in the shape file.
- Front tool and back tool are a half front and a half back. The only difference between the 2 pieces is the neckline. You can draft one piece, duplicate it (Piece/Duplicate) and change the neckline.
- As I want to keep those 2 pieces intact before making any changes, I will duplicate them (Piece/Duplicate) into front and back and tweak each piece.
- In this shape, back and front are 2 different lengths. The front is shorter than the back. Both end in a curve at the bottom edge, concave for the front, convex for the back.
- Back: (compared to back tool)
- Point 13 has been added on the side seam, about 5 cm below the sleeve (see marker).
- Point 12 has been dragged by 2 cm to the right, toward the centre seam. The table can also be used.
- Point 7 has been dragged downwards by about 2 cm.
- Use the curve tool to trace a curve between points 12 and 7.
- Front: (compared to front tool)
- Point 14 has been added on the side seam, about 5 cm below the sleeve (see marker).
- Point 13 has been dragged by 2 cm to the right, toward the centre seam. The table can also be used.
- Point 8 has been dragged upwards by about 6 cm.
- Use the curve tool to trace a curve between points 13 and 8.
- Once back and front have been modified as described above, duplicate each piece and flip one back and one front (Alter/Flip). As I like to always keep my “original” pieces, I duplicated each piece twice and I renamed them back 1, back 2, front 1 and front 2.
- Integrating shape and stitch pattern for Cut and Sew
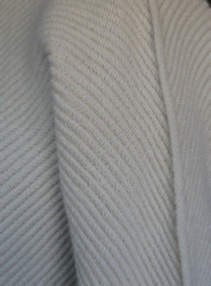
- After the integration and Cut and Sew steps, the ’pintuck shape’ will show against a ‘stocking stitch background’.
- Pintucks form a horizontal pattern when you knit them. Therefore, before integration, I had to choose the best orientation for each piece, not only in order to have diagonal lines but also for the “ease of knitting”. Indeed, although this is a cut and sewn project, there will be a lot of hand manipulation while knitting, i.e. moving stitches from one bed to the other as the ‘pintuck shape’ itself ‘evolves’ on the ‘stocking stitch background’.
- After taking the shapes, in different orientations, to Interactive knitting to knit them manually (i.e. without the machine, using the UP arrow key), I found it was easier to start each piece from the neckline. Therefore I rotated each piece by 135° (Alter/Rotate).
- I then integrated each piece with the stitch pattern in Stitch Designer and selected Shapes/Cut and Sew. I selected a (very contrasting) LMB colour that was not yet used in the pattern and chose LMB (RMB) colour and Fill Outside. The LMB colour will then be outside the piece.
- After the Integration and Cut and Sew steps, the 4 pieces are named back1.stp, back2.stp, front 1.stp and front 2.stp. (These cut and sew patterns are not downloadable using the button below, as the garment size can’t easily be altered in them. Any changes in size can be made more easily to the shape file in Original Pattern Drafting so that the cut and sew patterns you make in steps 4 & 5 are then automatically the right size.)
- Interactive knitting:
- Remember you will be knitting stitch pattern files, not shape files. Therefore: back 1.stp, Back 2.stp, Front 1.stp, front 2.stp. Do not open the shape file in interactive knitting!
- Do not forget to update the tension (Options/Tensions).
- You can see the *shape* (alternating red and white stripes) against the plain colour background.
The *shape * actually corresponds to the ‘pattern needles’ on both the main bed and the ribber while the main bed needles surrounding the *shape* are the excess fabric (stocking stitch) that will be serged off.
Knitting tips and finishing
- For each of the STP files (front 1.stp, front 2.stp, back 1.stp, back 2.stp) the knitting procedure will be the same. So, let’s take front 1.stp as an example.
- When you open front 1.stp in Interactive knitting, you will notice the number of needles to cast on is LN88 - RN88, with RN23 as the first and only stitch on the ribber.
Note: I cast on LN88-RN88 on both beds, full needle rib set up, and knitted a few rows first before starting the actual pattern. I then transferred all the stitches to the main bed, except RN23. - As you move up in the pattern, you will notice how the *shape* changes, i.e. more or fewer needles on either bed. This means you will be adding stitches to the ribber by transferring them from the main bed (or removing stitches from the ribber and transferring them to the main bed, depending on where in the pattern you are).
- When the pieces are completed, you can serge off the excess fabric.
- Next, you will knit all the circular bands: 1 for the front, one for the back, one for each sleeve, one for each side seam + sleeve seam, one for the neckline and one for the (removable) collar seam.
Each band has 6 rows (i.e. 12 carriages passes) and is removed on waste yarn. - Linking the circular bands:
- With the right side of the fabric facing you and the piece upwards, place one half front (or back or sleeve) onto the point needles.
- Place the open stitches of one edge of the circular band on the same point needles, waste knitting downwards.
- With the right side of the fabric facing you and the piece downwards place the other half front (or back or sleeve) onto the point needles.
- Fold the circular band towards you and place the open stitches on the point needles with the waste knitting downwards.
- Note: make sure you link your neckband first, before linking the second sleeve!
- Knit the circular edgings (hems) for back and front: 15 circular rows (i.e. 30 carriage passes).
- Knit the cuffs:
- Knit 5 repeats of the main pattern (pintucks) and end this part with 2 Full Needle Rib rows.
- Continue knitting in Full Needle Rib for the depth required.
- Since my cuff is 19 cm high, I needed regular increases. These are fully-fashioned with a 2-prong tool, on both beds at the same time.