Site map © Soft Byte Ltd 2012, 2025 Photos & screen shots are for illustrative purposes and may differ slightly from actual product.

Installing the cable link driver for a RISC PC or an ARM Mac with an M series processor
If the Mac has an ARM M1, M2 (etc) processor, it should in theory be able to use the built-in Apple driver, but in practice we have found that on some M series Macs the Apple driver doesn’t work. FTDI (the manufacturer of the chips used in our cables) has confirmed that they are aware of this problem with the Apple driver for some of these Macs. They have published a driver suitable for the M series Macs and it can be downloaded at the bottom of the following webpage: https://softbyte.co.uk/cablelinksdriver.htm
This driver is also suitable for PCs with RISC processors.
This driver can be used for all our current cable links and for the USB to serial converter. Proceed as follows.
1. Make a new folder on your hard disk and copy into it the zip file that you downloaded. Make the new folder in the Windows area of your hard disk, not the Mac area.
2. Attach your cable link to a USB port on the computer, and if it has a power supply, turn it on.
3. Open Device Manager as follows. Under Windows 10 or 11, type Device Manager into the search box and then select Device Manager from the list that appears.
4. In Device Manager, make sure View / Devices by type is selected.
5. In the list of devices, double click on "Ports (COM & LPT)".
6. This will produce additional lines in the list of devices, one for each port that the computer has. Each new line will be something like "USB serial port”
7. Look for a port called “USB serial port” or similar.
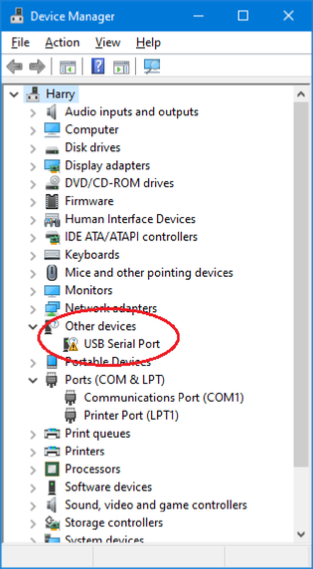
8. If it’s not listed under Ports (COM & LPT), look under the Other Devices category (if there is one).
9. You can check whether the listed device refers to your cable link by unplugging the link or converter. If the listed device disappears, this is a good indication that it did refer to the link or converter. Please reconnect it and follow the remaining points. If your device isn’t listed it could mean there is a hardware fault in the cable link: please contact your technical support (See DesignaKnit’s Help / Technical Support).
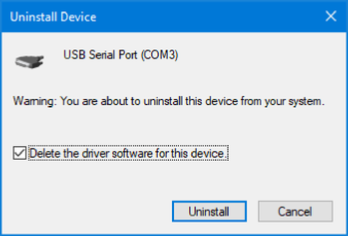
10. Right click on the port and from the right button menu select Uninstall. At this window, make sure the Delete option is ticked.
11. Click the Uninstall button. After it has uninstalled, disconnect your DesignaKnit cable link.
12. Disconnect your internet connection. If you don’t do that, it will just download the same default driver when you reconnect the DesignaKnit cable link.
13. Reconnect your DesignaKnit cable link. You may see the USB Serial Port has now appeared under Other Devices with a yellow warning icon. Right-click on it and select Update Driver.
14. Take the option to browse your computer for the driver, and navigate to the new folder you created and then to the zip file that you downloaded. At this point the ARM driver should become installed. Hopefully the USB serial port will then move to the Ports section in the above list, the warning icon will disappear, and the DesignaKnit cable link will work in the expected way.
15. Reconnect your computer to the internet.


Return to: Drivers for USB links or Support