Site map © Soft Byte Ltd 2012, 2025 Photos & screen shots are for illustrative purposes and may differ slightly from actual product.

Gallery
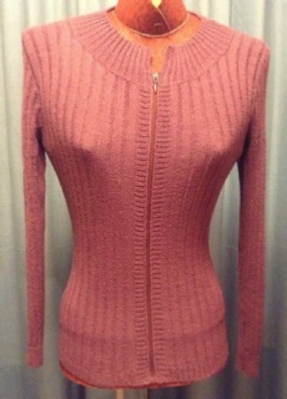
5 x 2 Ribbed Cardigan - by Christine Sabot
Click here for notes on how to put the shape file in your usual folder.
Inspiration: For ease of use, I like to wear light and tight-fitting cardigans rather than pullovers in the winter. The shape is a very classical one which can be used over and over again, in many colours and textures.
Size: S (Bust - waist - hips: 88 - 67- 96 cm)
Category: Knitting: * - Zipper sewing: **
Machine: Passap E6000
Yarn: Suzette Saint Lievin (0/15 Nm - 60% acrylic - 30% wool - 10% polyamide). 3 strands.
Total amount used: 246 grs.
Tension:
- 2 x 2 industrial ribs: 2.5 - 2.5
- 5 x 2 ribs: 4 - 2
Gauge: 10 x 10 cm:
- 5 x 2 ribs: 36 stitches x 66 rows
- Industrial 2 x 2 ribs: 36 stitches x 80 rows
Stitch pattern:
- The back and the 2 fronts start with 2 cm knitted in industrial 2 x 2 ribs.
- Industrial 2 x 2 ribbing is also known as 2 x 1 ribbing and produces a tighter fabric.
- To go from industrial 2 x 2 ribs to 5 x 2 ribs, transfer 2 back bed stitches to the opposite front bed needle.
Shape:
The basic shape (back, front and sleeves) was created in DesignaKnit Original Pattern Drafting to my own measurements.
- For the front piece, for instance, I first draw a rectangle total length by half bust measurement.
Then I use the vertical mirror and position the waist, the shoulder and the underarm. - I then shape the armhole and the neckline.
- I copy and paste this block and re-shape the back neckline and the armholes.
- Sleeve: I start from a rectangle, total length by width, and proceed with the vertical mirror to shape the sleeve cap.
Knitting tips and finishing
- To finish each shoulder, I transfer all the stitches to the front bed, short row them and remove on a contrasting waste yarn. I cast them off with a backstitch through the open stitches.
- The bands are also removed on waste yarn.
- I then steam each piece and the bands gently, without stretching the ribs.
- Next, I join the shoulders, mattress stitch the side seams and sleeves and backstitch the front bands in place.
- I then check on my mannequin that the whole garment is OK .
At this stage, I also check the back neckline and will make it deeper, if need be, by cutting off with my serger. - Next, I decide on the depth of the neck band, knit it, remove it on waste yarn and backstitch it to the neckline.
- I then lay the garment on my ironing board, public side facing up, with the 2 fronts pinned to the board so they match exactly the back underneath and I steam it, hovering the iron about 1 cm above the garment.
- A row of crab stitch has been crocheted along the 2 front bands and the collar (1.5 mm crochet hook).
As it is critical, at this stage, not to stretch the pieces too much or too little, I first test along a small section and write down the number of stitches I have to pick up to make a smooth finish. It is sometimes easier to first do a single crochet row before doing the crab stitch. - Back to the ironing board: pin the 2 front bands into place again, steam lightly, making sure the 2 fronts match perfectly.
- Inserting the zipper:
- The zipper should be as lightweight as possible. It should be washed and ironed first.
- When it is ready, insert it between the 2 fronts, without pulling or gathering too much. It should lay flat. Pin and sew.
- On the inside of the garment, I usually do a hem stitch along the zipper on the fronts and neckline seam, for a neat finish.
- The last step is the final steaming of the shoulder seams, side seams, sleeve seams, front zipper and bands.
Tip: To make steaming the shoulders easier, I made an “ironing shoulder pad” by sewing together 5 thick shoulder pads.

There is no stitch pattern to download for this garment