Site map © Soft Byte Ltd 2012, 2025 Photos & screen shots are for illustrative purposes and may differ slightly from actual product.

Gallery
Baby Jacket - by Cathie Sanders
Click here for notes on how to put the shape file in your usual folder.
Inspiration: I wanted to make a warm jacket for my grandson that was easy to put on.
Size: Chest/Waist 23 inches, finished length 13 inches.
Category: **
Machine: Brother standard gauge.
Yarn:
- Tamm 3-Ply Acrylic or any soft yarn.
- You will need a main colour plus two contrasting colors. (I used blue for the main colour and red and yellow for the contrast).
Tension:
- Stockinette: 6
- Fairisle: 7
Gauge per inch:
- 7.5 spi x 10.5 rpi
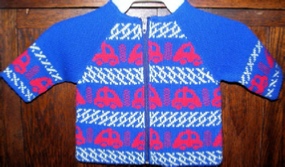
The first picture shows the back of the jacket.
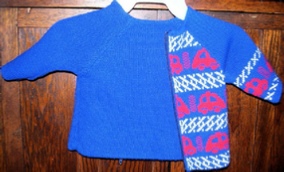
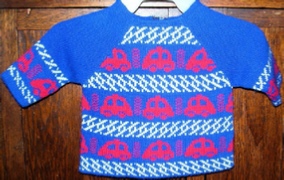
The second picture shows the front of the jacket while the third shows the inside.
Stitch pattern
- The pattern is inspired from pattern 46 in the Stitch World Pattern Book but the details are not identical.
- I designed the pattern to be as colorful as possible.
- Since one half of each shape is the lining, floats are not a concern.
- I started with the yellow border and the first row of red cars. Then I added enough rows at the top to copy and paste that design. I selected the cars and border of the new design and flipped it horizontally so the yellow diagonals ran in the opposite direction and the cars faced in the opposite direction. Then I boxed in the car and column only and shuffled it sideways so the cars and columns lined up with the previous row of cars and columns.
- To integrate the shape and the stitch designs, I opened a new Stitch Designer screen. I then brought in the shapes on the empty canvas. I used the box tool to enclose the body pieces, one at a time, from the middle (which will become the hem) to the shoulder top. I then imported the stitch pattern so it filled only the top, which will become the outside. I did box in a narrow stripe on the sleeve edge so I would have only a band of color instead of the overall design. I put the band only on the top of the sleeve (which will become the outside).
Shape
- I started the jacket in Standard Garment Styling by selecting a baby raglan shape closest to the size I needed.
- The front opening becomes the back opening and the solid back becomes the front, so I lowered the back neck depth to the same measurement as the front neck depth. Anyone who has tried to put a jacket on a baby will realize how much easier it is to put the baby on his stomach to slip the arms through the sleeves and then fasten the back up with the zipper.
- Because babies grow so quickly, I chose oversize ease and increased the length of the body and sleeves.
- The jacket will be self-lined so the cuffs can be turned back until the baby grows into them.
- I took the shape into Original Pattern Drafting. Except for the sleeve, I duplicated each of the other 3 pieces. I rotated the second sleeve, second left front, second right front, and second back 180 degrees. I flipped the rotated fronts. Then I moved each second piece directly under the original pieces.
- I joined all of them so the original 8 pieces became 4. I then placed a marker on each body piece in the middle where they were joined together.
- This same idea could be used with any cardigan pattern. But for older children up through adult sizes, the cardigan would be worn in the regular way so there would be no reason to lower the back neck edge, to use oversize ease, or to lengthen the sleeves.
Interactive Knitting Notes
- When knitting the back, you will need to start on one side only because of the neckline shaping which is knitted first on the lining.
- The carriage will start on the left. But, when you reach the bottom of the left lining neckline, DesignaKnit will fade out the left and highlight the right side. Your yarn is still attached to the left side.
- You have two options:
- Break off the yarn and start again from the original e-wrap on the right side or
- Use a second cone of yarn.
I broke the yarn, finished the right side, and then continued using the same cone when the left side was added back into work. Either way you will be breaking the yarn.
The same holds true at the opposite end, except DesignaKnit will prompt you to put one side in hold. You will be knitting an upside-down neckline to start with and ending a right side up neckline.
Knitting tips and finishing
- Begin each body piece by e-wrapping on with the MC and knitting in stockinette until the marker is reached.
- Turn on the patterning for your machine.
- When you add in the CC, change the tension.
- Continue in fairisle until the shape is finished.
- For the sleeves, knit in stockinette except for the band of color, being sure to change the tension before and after.
- Steam all pieces.
- You will be sewing this jacket together as you would a lined vest.
- Fold up the body pieces until the stockinette lining is aligned with the fairisle top.
- Lightly steam each piece again.
- Match up the body and the sleeves.
- Starting with the right side, stitch each seam for the shoulders, sleeves and sides.
- Then seam the lining in the same way, being careful not to catch any part of the outside, including the first seam.
- Finish by stitching the lining neckline to the fairisle neckline.
- The last step is to insert a separating zipper. Stitch the zipper to the opening. I stitched the zipper to the lining by hand, but it could be done using a sewing machine.
Design Note
- This jacket could also have an attached hood.
- A simple hood could be knitted as two rectangles as follows:
- In Original Pattern Drafting, choose New Piece. Name it Hood.
- The width is the measurement from the side middle of the front, around the back, and to the side middle front. The height is the measurement from the neckline to a point a half-inch down on the forehead.
- Split the hood into two vertical rectangles. Don’t forget to duplicate and join the duplicates to the originals so the lining will be stockinette and the outside will be fairisle.
- Knitting notes:
- When knitting, take the 4th needle from one edge out of work. On the second piece, take the 4th needle from the opposite end out of work. The lines are to mark the casing.
- After folding the bottom up to the top, stitch the outside edge of the lining and fairisle together, leaving the center seam open.
- Stitch the two halves around the neck opening, being careful not to catch the centers or the casing.
- Insert the beginning of the zipper from the top of the hood to the end of the jacket. Stitch the rest of the center opening closed, being careful to keep the lining and fairisle separate.
- Knit an i-cord the length of the casing plus 15-18 inches. Fold the casing to the inside and stitch the edge to the lining. Insert the i-cord. Use the i-cord to pull the hood close to the baby’s head by tying it into a bow.
If you would rather not have a cord at the baby’s neck, you may insert a piece of gentle elastic through the opening, stitching it to the lining at each end.
As the baby grows, you may remove the elastic and replace it with a longer piece.


 Download shape file
Download stitch pattern file
Solutions - Individual
 Solutions for Business
 Solutions for Education
 DesignaKnit & Industrial Machines
Standard Garment Styling
 Original Pattern Drafting
 Stitch Designer
 Interactive Knitting
 Graphics Studio
 DesignaKnit Printouts
 DK9 System Requirements
 DK9 Product Levels
SD Symbols
 SD Stitch Cables
 SD Lettering
 SD Lace
 SD Mirrors
 SD Curves
 SD Tiling
 SD Shadows
 SD Integrating
Cable Links - Silver Reed
 Cable Links - Brother
 Cable Links - Passap
 Cable Links - ScreenLink & Platform
 Magnet Arms
 USB Converter
Fittingly Sew - Slopers & Templates
 Fittingly Sew Tools
 Fittingly Sew and Fabrics
 FS System Requirements
Fittingly Sew and Digital Fabric Printing
 Fittingly Sew and Model Making
 Fittingly Sew - Fabrics and Layplans
DesignaKnit English Video Tutorials
 DesignaKnit German Video Tutorials
 DK8 Video Tutorials
 Fittingly Sew Video Tutorials
 FS2 Video Tutorials
DK9 Tutorials - Standard Garment Styling
 DK9 Tutorials - Original Pattern Drafting
 DK9 Tutorials - Stitch Designer
 DK9 Tutorials - Interactive Knitting
 DK9 Tutorials - DesignaKnit Graphics Studio
DK9 German Tutorials SD1
 DK9 German Tutorials SD2
 DK9 German Tutorials SD3
 DK9 German Tutorials SD4
 DK9 German Tutorials SD5
 DK9 German Tutorials SD6
DK8 Tutorials - Standard Garment Styling
 DK8 Tutorials - Original Pattern Drafting
 DK8 Tutorials - Stitch Designer
 DK8 Tutorials - Interactive Knitting
 DK8 Tutorials - DesignaKnit Graphics Studio