Site map © Soft Byte Ltd 2012, 2025 Photos & screen shots are for illustrative purposes and may differ slightly from actual product.

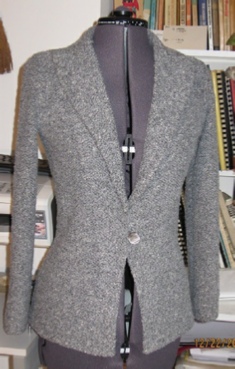
Knitweave jacket - by Loulou Pirotte
Gallery
Inspiration: I have always been intrigued by dressmaker and tailoring details. This is a very popular dressmaker shape. But, it is important to remember that, whatever the type of dressmaker garment we want to knit, the knitted version will be different, in its fabric, from the original which is usually woven. Knitted garments will also require different construction methods. (See below: Shape).
Size: petite (Bust - waist - hips: 88 - 68 - 88 cm)
Category: **
Machine: Brother electronic standard gauge KH970.
Yarns:
- Main yarn: Grignasco Flammé, 3/18 Nm, 70% merino - 30% cotton. 1 strand.
- Weaving yarn: Bouclé Saint Liévin (fine yarn but count unknown). 62% acrylic - 23% polyamide - 15% wool. 2 strands.
Total amount used: 460 grs.
Tension: 8 - The weaving yarn is threaded through the tension mast.
Gauge: 10 x 10 cm: 25 stitches x 42 rows.

Click here for notes on how to put the shape and stitch pattern files in your usual folder.
Stitch pattern:
Pattern #461 in the Stitch World book. This pattern is in DesignaKnit 8’s library (Stitch patterns/Brother/Stitch_World).
I used KCII as I found the edges were neater.
Knitting method: R
Stitch pattern and shape are integrated.
Shape:
The basic shape (back, fronts and sleeve) was created in Standard Garment Styling and tweaked in Original Pattern Drafting.
- I like to create set-in sleeve shapes in DesignaKnit Standard Garment Styling. I save my file as “xxx SGS” before opening the shape in Original Pattern Drafting so I can get back to it easily if I want to make some changes.
- In the Body Measurements window, I always give the measurements of the finished garment.
- Knitting is forgiving! I use no ease and even negative ease, namely for the shoulder measurement.
- When tweaking the shape in Original Pattern Drafting, make sure you do not change any points that may affect the height of the sleeve cap (armhole depth, shoulder width, sleeve width, bust measurement).
- I started from a basic set-in, V-neck cardigan.
- To design the neckline, collar and lapels: I put a sheet of paper on my ironing board, placed one of my woven jackets over it and followed the outline with a sewer’s tracing wheel. This gave me a paper pattern whose measurements I gave to the new pieces I blocked in Original Pattern Drafting.
- Knitweave is not a reversible fabric. Hence, the lapels will have to be knitted separately and attached to the fronts. Make sure their width is enough so the seam is not visible, i.e. hidden along the front edges, about 2 cm in on the wrong side of the piece.
- Also, the original woven garment you want to knit may be shaped by means of princess seams or vertical darts. Vertical darts can be very nice in stocking stitch but can disrupt any other stitch pattern. This is when edge shaping comes in very handy… Account for this waist shaping when you tweak your standard shape in Original Garment Shaping.
- If you want to avoid hem ‘droop’ on the side seams, consider short rowing 1/3 of the piece width, each side for the back, outside third (at the side seam) for the fronts, over a depth of 3 cm.
Knitting tips
- Most woven garments can be ‘translated’ into knitted garments but some factors must be taken into account such as the yarn, the stitch pattern, the mechanics of knitted fabrics, etc. for the type of project you are considering.
- Some minor (or major) adjustments may also have to be made as some sewing features cannot be reproduced as such on our machines. In this particular case, because knitweave is not reversible, the lapels cannot be knitted as an extension of the fronts. They are knitted separately and stitched to the fronts.
- Back , fronts and sleeves start with a hem knitted in the same stitch pattern:
Start on waste yarn, knit one row with ravel cord and e-wrap cast on. The hem, up to the fold line, is knitted at main tension - 2, with the main yarn and only 1 strand of the weaving yarn to avoid bulk. The fold line is knitted at main tension - 6 so that the knitting will fold towards the knit side (in knitweave: the wrong side, i.e. the side away from you while knitting) and the hem will not stick out around the bottom.
- Short rows are worked directly above the hem to avoid ‘hem droop’ on the side seams.
- For 1- or 2-stitch increases and decreases, shaping is fully fashioned with a 2-prong tool. This produces much neater edges than shaping on the edge stitches.
- Facing: the facing is knitted as an extension of the front. The 20 stitches required for the facing are added directly after the hem, on the carriage side.
It is also possible to add those stitches when the carriage is on the opposite side, using a separate piece of yarn. Actually, I prefer this method. To cast on those stitches, I knit them manually (Knitted back e-wrap) - Collar: is knitted from the outside edge up to the neckline and the shaping tag is H:
Cast on the total number of needles required for the largest width of the piece (i.e. Ln41-Rn41), set carriage to hold and put Ln41-Ln30 and Rn30-Rn41 into hold.
Next, pick up (put back into working position) x needles, as instructed by DesignaKnit.
- All the pieces were linked together (except the lapels). I find the linker gives knitweave garments a more ‘tailored’ look, especially the seam sleeve cap/armhole.
- As always, my hems and facings are set in place with iron-on fusible material. Some heavier (iron-on) interfacing has also been added between the collar, lapels and their facings.