Site map © Soft Byte Ltd 2012, 2025 Photos & screen shots are for illustrative purposes and may differ slightly from actual product.

Gallery
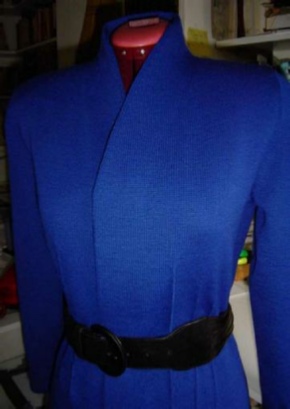
Full Needle Rib Long Stitch Jacket - by Loulou Pirotte

 Download shape file
Click here for notes on how to put the shape file in your usual folder.
There is no stitch pattern to download for this garment.
Inspiration: I have always been intrigued by dressmaker and tailoring details. This is inspired by a basic dressmaker shape, modified to some extent. It is important to remember that, whatever the type of dressmaker garment we want to knit, the knitted version will be different, in its fabric, from the original which is usually woven. Knitted garments will also require different construction methods.
Size: petite (Bust - waist - hips: 88 - 68 - 88 cm)
Category: *
Machine: Electronic standard gauge Brother KH965i
Yarn: 100% wool, Molins (Paris), 2/28 Nm. 2 strands.
Total amount used: 550grs.
Tension: 1 on both carriages, with slide lever on II. The close knit bar is used.
Gauge: 10 x 10 cm: 36 stitches x 88 rows.
Stitch pattern:
- This is full needle rib with a long stitch: the main carriage is set to knit and one PR button (left or right) is UP on the ribber carriage.
The main bed will knit in both directions while the rib bed will slip in one direction. - The right side of the fabric is facing you while knitting.
- The Vertical Pintucks are hand sewn when the pieces are off the machine.
- Tip: Measure your swatch on the wrong side of the fabric.
If you measure it on the ‘public’ side, multiply the number of rows by 2. - Knit this jacket interactively, shape only.
Shape:
The shape was designed in Original Pattern Drafting.
- The shape file has 4 pieces: Back, Front 1, Front 2 and Sleeve.
- Block your new pieces and Fit them To Height and Width, taking into account the facings, the hems, the front overlap AND the pintucks.
You can use the Table or the Plus and Minus tools or drag your points.
The front can also be constructed from the back piece: duplicate the back piece, set the Origin at the
centre and use Piece/Separate. Don’t forget to add the facings and overlap! The front piece can also be duplicated and flipped. - Each vertical pintuck requires 2 stitches. Each front has 3 pintucks and the back has 6 (3 on either side of the centre).
Once you have tweaked your pieces, work in Stitches and Rows mode, open the Table (Piece/Table) and add 6 stitches to each front and 12 stitches (6 on either side) to the back. Add those stitches on the side seams points, just above the hem, at the waist and at the beginning of the armhole.
When you reach the armhole bind-off point in Interactive Knitting, DesignaKnit will include those additional stitches in the number of stitches you need to bind off. - If you are using a dressmaker pattern, do not use the ease recommended for the woven garment. Knitting is forgiving! For instance, I always use negative ease for the shoulder measurement. I want the shoulder line at shoulder point, not off the shoulder.
- Collar: this is a built-up neckline (it extends above the base of the neck in back and front) and is constructed all in one with the bodice. It can be developed in different ways, from another point along the shoulder for example, depending on how far you want the collar to stand up away from the neck.
The depth and width of the V-neck opening are a matter of personal taste. I used a mock-up before designing the front collar and facing but the “paper doll” is another technique one can use to ‘see’ a garment, or part of it, in three dimensions. - The small “>” shape in the front facings and the 2 inverted “V” shapes at collar level are constructed to remove excess fabric at the point of the V-neck and in the collar, when the facings are folded in.
- Each piece starts with a hem that will be folded in.
- The front facings are constructed and knitted as an extension of the piece.
Note: I like to take my shapes into Interactive Knitting and “knit them manually” before starting the actual knitting, to make sure everything is OK.
By “knit manually”, I mean using Interactive Knitting *without the machine*, i.e. using the UP arrow tool.
Knitting tips and finishing
- Most woven garments can be ‘translated’ into knitted garments but some factors must be taken into account such as the yarn, the stitch pattern, the mechanics of a knitted fabric, the features of the machine itself, etc. for the type of project you are considering.
Choice of the yarn and stitch pattern is important: full needle rib with a long stitch has much body and firmness while retaining a wonderful softness.
If you are using a dressmaker pattern, keep in mind that a tailored garment may need changing to some extent for knitting. Think of a jacket, for instance, that has many darts, both functional and non functional, let alone a tuck pleat between the collar and the centre front first sidepiece, and extending into a slip pocket.
The vertical pintucks, hand sewn when the pieces are off the machine, act as darts and beautifully enhance a waist that was already cinched during the shaping process. - Back, fronts and sleeves start with a hem knitted in the same stitch pattern but, in a double-bed pattern, I always start the hems with a few circular rows at the tightest possible tension. This gives the hems more stability and prevents them from flaring.
- Shaping is fully-fashioned with a 3-prong tool , for all the decreases and increases of every piece, armhole and sleeve cap included, and with a 4-prong tool for the decreases along the V-opening of the front. Shaping occurs on both beds at once. Make sure you shape your pieces when both beds have knitted.
Note: The decreases along the V-opening of the front are not done at the edge of the facing but in the bodice of the garment, i.e. along the folding line of the facing. This also produces a very nice folding line and no turning ridge is needed.
- With the 4-prong tool, move in 4 stitches by one stitch.
- Next, move in all stitches on both beds to fill the empty needles.
- If you want to avoid hem ‘droop’ on the side seams, consider short rowing 1/3 of the piece width, each side for the back, outside third (at the side seam) for the fronts, over a depth of 3 cm. Short rows are worked directly above the hem.
- Facing and collar: the facing is knitted as an extension of the front. The 43 stitches required for the facing are added directly after the hem, on the carriage side.
- It is also possible to add those stitches when the carriage is on the opposite side, using a separate piece of yarn. Actually, I prefer this method. To cast on those stitches, I knit them manually (Knitted back e-wrap ) and transfer the heels of the stitches from the main bed to the ribber.
When adding stitches in double-bed work, it may be difficult to hang a cast-on comb, especially if you already have a large number of stitches in work. To work around this, I cast on the new stitches (Knitted back e-wrap), transfer the heels of the stitches from main bed to ribber, place a ravel cord over the newly cast on stitches and pull down on the ravel cord, from under the beds, until the knitting is long enough to hang a comb and/or weights. - The small “>” shape in the front facing is constructed to remove excess fabric at the point of the
V-neck when the facing is folded in. The shaping tag is H and this is short rowed. In the same way, the inverted “V” shapes, at collar level, are constructed to remove excess fabric.
- The sleeve cap is longer than requested to fit the armhole. This is in order to have a surplus of fabric which will serve as a small shoulder pad.
- If you turn on the Marker tool in the DesignaKnit shape file, you will notice markers on every piece. These mark the fold line, i.e. the row or stitch where the facings and hems will be folded in.
- Pintucks: Once the pieces are completed, the pintucks can be hand sewn (or linked).
- 3 pintucks on each front and 6 on the back piece (3 on either side of the centre).
- They all start on the same row/same distance from the folding line of the hem.
- The height of each pintuck is different: 17, 20 and 23 cm, part of this measurement below the waist line and part above it and the distance between each pintuck is 3 cm.
- As a guide, you can baste between the 2 stitches you added for each pintuck, over the height/ number of rows of each pintuck.
- Sew the pintucks: you can either back stitch them or use the linker. If you use the linker, position the pintucks on the linker so that the chain stitch is facing the side seam.
- All the pieces were mattress stitched together.
- As always, my hems and facings are set in place with iron-on fusible material.