Site map © Soft Byte Ltd 2012, 2025 Photos & screen shots are for illustrative purposes and may differ slightly from actual product.

Gallery
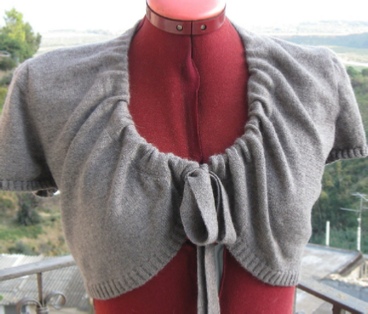
Bolero with Tie - by Loulou Pirotte

Size: petite (Bust - waist - hips: 88 - 68 - 88 cm)
Category: *
Machine: Brother KH120, push-button fine gauge machine.
Yarn: Linea Più Classico Mou, 2/28 Nm, 65% merino - 35% angora. 1 strand in stocking stitch and in full needle rib, 2 strands in 2 x 2 ribs.
Total amount used: 130 grs.
Tension:
- Stocking stitch: 2
- 2 x 2 rib: 7 on both carriages and slide lever on II.
- Full needle rib (tie): 7 on both carriages, slide lever on II
Gauge: 10 x 10 cm:
- Stocking stitch: 47 stitches x 54 rows
- 2 x 2 rib: 44 stitches x 66 rows.
- Full needle rib (tie): 52 stitches x 37.5 rows.
Stitch pattern:
- This is plain stocking stitch.
- The hems (bodice and sleeves) are knitted in 2 x 2 ribs. The tie is in full needle rib.
Shape:
The basic shape (back, fronts and sleeve) was originally created in Standard Garment Styling and tweaked in Original Pattern Drafting. Actually, I used the shape of another bolero (Knitwoven Bolero, also in the DesignaKnit Gallery).
Only the fronts needed to be altered.
The back and front hems are not represented in the shape file. Neither are the “casing” (knitted separately) and the tie.
- The shape was knitted iinteractively with the BrotherLink 5.
- I like to create set-in sleeve shapes in DesignaKnit Standard Garment Styling. I save my file as “xxx SGS” before opening the shape in Original Pattern Drafting so I can get back to it easily if I want to make some changes.
- In the Body Measurements window, I always give the measurements of the finished garment.
- Knitting is forgiving! I use no ease and even negative ease, namely for the shoulder measurement. I want the shoulder line at shoulder point, not off the shoulder.
- When tweaking the shape in Original Pattern Drafting, make sure you do not change any points that may affect the height of the sleeve cap (armhole depth, shoulder width, sleeve width, bust measurement).
- I started from a basic set-in, V-neck cardigan.
- Sleeve cap: you will notice that the shape is fairly unusual since the piece is extended from the end of the actual cap over a height of 9 cm. This is to produce some excess fabric that will act as a shoulder pad.
You can either leave it flat (under the shoulder seam or under the sleeve cap) or roll it over itself for a ‘shoulder pad effect’). - Note: You can take your shapes into Interactive Knitting and “knit them manually” before starting the actual knitting, to make sure everything is OK.
By “knit manually”, I mean using Interactive Knitting *without the machine*, i.e. using the UP arrow tool.
Knitting tips and finishing
- Every piece starts with a small 10-row hem (1.5 cm) in 2 x 2 rib.
- Front left: The shaping tag for the base is H:
- Cast on the total number of needles required for the base of the front (i.e. LN61-RN49), and knit 10 rows in 2 x 2 rib. Next, transfer the stitches from the ribber to the main bed.
- Set carriage to hold and put all the needles into hold except LN61-LN46.
Next, pick up (put back into working position) x needles, every 2 rows, as instructed by DesignaKnit and go on knitting, shaping as instructed by DesignaKnit.
- Front right: reverse shaping directions for front left.
- For 1- or 2-stitch increases and decreases, shaping is fully fashioned with a 3-prong tool. This produces much neater edges than shaping on the edge stitches.
- Casing:
- This is knitted separately, in 2 parts. The length was determined by putting one front and half the back neckline on the linker ‘s needles: 175 stitches. Stocking stitch.
- E-wrap cast on and knit 48 rows at tension 2, 1 strand.
- Remove on waste yarn.
- Knit second half of the casing in the same way.
- Tie: knitted in full needle rib at tension 7 on both beds, slide lever on II: 13 stitches x 600 rows.
- Linking the casing to the front and back (½ neck):
- With the wrong side facing you, place the e-wrap edge of the casing, waste knitting upwards, on 175 linker needles.
- Place the front (centre) edge on those needles, right side facing, piece downwards.
- Fold the casing towards you and place the open stitches on the same needles, waste knitting downwards.
- To link the sleeve to the armhole:
- Baste between the 2 markers on either side of the ‘actual edge’ of the sleeve cap (not the edge of the ‘additional cap’).
- Mark the centre of the sleeve just under the basted line.
- Place the armhole, right side facing, on the linker’s needles.
- Place the sleeve, wrong side facing, on those needles. Follow the basted line at the top of the sleeve.
- NB: do step 4 in 2 operations. (Half the sleeve at a time).
- The side and sleeve seams are mattress stitched together.
Click here for notes on how to put the shape file in your usual folder.
There is no stitch pattern to download for this garment.