Site map © Soft Byte Ltd 2012, 2025 Photos & screen shots are for illustrative purposes and may differ slightly from actual product.

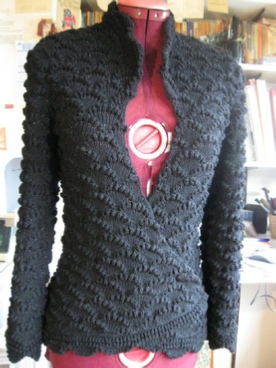
Passap Tuck Jacket - by Loulou Pirotte
Gallery
 Download shape file
Download stitch pattern file for Duo
Click here for notes on how to put the shape and stitch pattern files in your usual folder.
Stitch pattern:

Source:
TO & FRO (England), vol. 12 No. 3, Winter 1989, pp. 29-31.
Machine Knit America (USA), vol. 3, No. 2, September/October 1993, pp. 30-32
“More Creative Fabrics from Susanna Lewis”. Rib Tuck: Knops & Wavy Ribs, Part 2. Shell pattern with border, made on Duomatic. (Self-punched Deco Card or E6000 pattern n° 1130)”.
We wish to thank Susanna Lewis for giving us permission to publish the material in the above articles.
- 1130/KT 139 on Passap E6000, or download the stitch pattern using the button below for use on the Duomatic. (This pattern won’t work on Japanese machines as there are adjacent tuck symbols.)
- Full Needle Rib set-up.
Border:
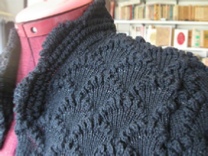
- The lower border (scallops) is made by knitting the first 20-row sequence.
- The pattern is then stopped to knit the knops: all pushers in rest position, *8 rows N/KX - 4 rows N/N*. Repeat *-* 3 times.
When the border is completed:
- Start the pattern again and knit from where you stopped. All pushers in working position.
- Pattern sequence: *16 rows with the main yarn (merino) N/KX - 4 rows with the Lurex + Crepe N/N*
- Note: the last 4 rows of each 20-row sequence are knitted with the lurex and crepe to enhance the shells.
Shape:
The basic shape (back, fronts and sleeve) was created in Standard Garment Styling and tweaked in Original Pattern Drafting.
- I like to create set-in sleeve shapes in DesignaKnit Standard Garment Styling and save my file as “xxx SGS” before opening the shape in Original Pattern Drafting so I can get back to it easily if I want to make some changes.
- In the Body Measurements window, I always give the measurements of the finished garment.
- Knitting is forgiving! I use no ease and even negative ease, namely for the shoulder measurement.
- I started from a basic set-in, V-neck cardigan and tweaked the shape in Original Pattern Drafting: cinched the waist, changed the shape of the V-neckline (curved it below the straight line that will have the collar added) and created the asymmetry in the fronts. Prior to creating this asymmetry, I used a mock-up, pinned on a mannequin.
Note: the “paper doll” is another technique one can use to ‘see’ a garment, or part of it, in three dimensions. - When tweaking the shape in Original Pattern Drafting, make sure you do not change any points that may affect the height of the sleeve cap (armhole depth, shoulder width, sleeve width, bust measurement).
- You can take your shapes into Interactive Knitting and “knit them manually” before starting the actual knitting, to make sure everything is OK.
By “knit manually”, I mean using Interactive Knitting *without the machine*, i.e. using the UP arrow tool.
- The shape file has 11 pieces: Back, Front Right & Left, Front 1 & 2, sleeve, Back border, Left & Right borders, collar and cuff. (I always separate the hems, cuffs and bands from the bodice pattern).
- Front Right & Left are the pieces as they are knitted.
- Front 1 & 2 are the actual garment pieces, after Cut & Sew.
- Only the Back and Sleeves start with the scalloped border. For all the other pieces, the borders are knitted separately.
Knitting tips
- Most woven garments can be ‘translated’ into knitted garments but some factors must be taken into account such as the yarn, the stitch pattern, the mechanics of the knitted fabric, the technical features of the machine itself, etc. for the type of project you are considering.
For this project, among others: the right yarn weight for a jacket as well as a stitch pattern that would produce the scallops along the edges. Also, cut and sew had to be used. - Some minor (or major) adjustments may also have to be made as some sewing features cannot be reproduced as such on our machines. In this particular case, I needed to cinch the waist differently from a dressmaker pattern where front and back are shaped by vertical darts, from shoulder to bottom. Cut and sew had to be used because the Passap technique used for this project (KT139) does not allow for the Holding Position to be used.
- Shaping is with a 2-prong tool for all the pieces.
- Back and sleeves start with the scalloped border because the cast-on edge is straight.
- Although front right and front left start with a straight edge, they do not start with the scalloped border because the pieces will be cut and sewn into the curved shape as it can be seen in front 1 & 2.
In order to get a template for the cut and sew operation with this built-in Passap pattern, I printed out the pattern pieces in the ‘Knitleader format’. - The Left and right borders as well as the collar are knitted separately. When the border is completed (see above: Stitch Pattern/Border), the stitch size is increased to 5.5 and the piece is ended with circular rows. It is then removed from the machine on waste yarn.
- Those borders are then linked to their respective pieces.
- If you turn on the Marker tool in the DesignaKnit shape file, you will notice 2 markers on the Back collar. These mark the fold line, i.e. the row where the collar facing will be folded in. If you don’t want a facing, delete points 1 & 2.
- All the pieces were linked together. I find the linker gives such textured jackets a more ‘tailored’ look, especially the seam where the sleeve cap joins the armhole.
Inspiration: I have always been intrigued by dressmaker and tailoring details. This is inspired by a basic dressmaker shape, modified to some extent. It is important to remember that, whatever the type of dressmaker garment we want to knit, the knitted version will be different, in its fabric, from the original which is usually woven. Knitted garments will also require different construction methods. (See below: Shape).
Size: petite (Bust - waist - hips: 88 - 68 - 88 cm)
Category: ***
Machine: Passap E6000 32K
Yarns:
- Luigi Botto Vallemosso, 2/30 Nm, 100% merino. 2 strands.
- Lurex Frisette (Molins, Paris). 3000 m/100 grs. 100% polyester. 1 strand.
- Crepe (Molins, Paris). 2/32 Nm. 89% acrylic - 11% polyamide. 1 strand.
- Lurex and Crepe are plied as they knit, on a twisting yarn stack.
Total amount used: 450 grs. (380 grs of the 2.30 Nm).
Tension: 3.25/3.25
Gauge: 10 x 10 cm: 17.4 stitches x 102 rows.