Site map © Soft Byte Ltd 2012, 2025 Photos & screen shots are for illustrative purposes and may differ slightly from actual product.

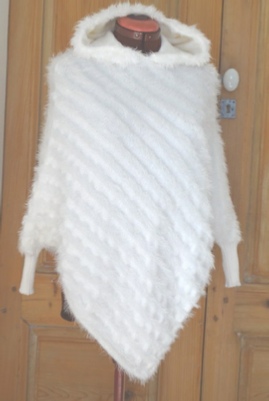
White Poncho - by Loulou Pirotte
Gallery

Size: petite (Bust - waist - hips: 88 - 68 - 88 cm)
Category: *
Machine: Brother electronic standard gauge KH970
Yarns:
- Lineapiù Classico Mou (2/28 NM, 65% merino wool – 35% angora). 3 strands
- Fur/eyelash yarn with Lycra (no brand, no count but the yarn is very fine). 1 strand
- Total amount used: 500 grs
Tension:
- Stocking stitch stripes: 7 (8 rows with 3 strands of the 2/28 NM followed by 12 rows with 1 strand of the fur /eyelash yarn)
- 2 x 2 ribs (cuffs): 3 strands of 2/28 NM at tension 3/3 + slide lever on II
- Circular bands (along the edges): 1 strand of fur yarn - 16 carriage passes at tension 0/0, slide lever on II
Gauge: 10 cm x 10 cm
- Stocking stitch: 32 stitches x 58.8 rows
- 2 x 2 ribs: 36 stitches x 66.6 rows
Circular rows: 31.5 stitches x 80 rows (or 160 carriage passes)
Stitch pattern:
One repeat of the pattern consists of 8 rows with 3 strands of the 2/28 NM followed by 12 rows with 1 strand of the fur yarn.
I designed a 20 x 20 pattern in Stitch Designer, using colour for the fur stripes so that, while in Interactive Knitting, I would get the “Change A” instruction when I needed to change yarns.
Knitting method: W
Stitch pattern and shape are integrated.
Shape:
The shape was designed in Original Pattern Drafting.
The file has 8 pieces. The cuffs and circular bands are not represented.
- tool: basic shape to the required measurements.
- hood
- fur edging for the hood
- back worn and front worn: tool rotated 45°
Draw the neckline: add 2 points whose distance is the width of the neckline. Delete the top point and use the curve tool to draw the neckline. Please see comments below.
- back: knitting = back worn rotated 45° anticlockwise. The stripes will be horizontal while knitting and diagonal when the garment is worn.
- front new = front old with neckline corrected
I was happy with the neckline as it had been drawn in front worn BUT:
Click here for notes on how to put the shape and stitch pattern files in your usual folder.
- Rotate front worn 45° anticlockwise, zoom in on the neckline and observe points 5 & 6 and 1 & 11 (of the rotated piece). You can see at a glance that a neck that deep won’t allow it to be knitted in one section. It you want to knit it in one section, it must have less sharp neck edge points.
- If you take front worn (rotated) into Interactive Knitting, you will see those 2 “triangles” need to be knitted in a separate section (Hold).
Side note: I like to take my shapes into Interactive Knitting and “knit them manually” before starting the actual knitting, to make sure everything is OK.
By “knit manually”, I mean using Interactive Knitting *without the machine*, i.e. using the UP arrow tool.
Knitting tips:
- I started each piece on waste yarn and then did an e-wrap cast-on with the main yarn.
- The circular bands are knitted separately and linked to the edges.
Hood:
- Join one shoulder seam and attach the hood to the neckline. I used the linker.
- Join second shoulder seam.
- Cuffs: 2 x 2 ribbing. Mine are 10 cm long but the length will depend on your arm length which, in turn, will depend on the number of stitches you were able to cast on for this sideways project.
- Plain stocking stitch, 3 strands of the 2/28 NM yarn. Knitted in 1 piece, starting from the base (i.e. the part that will be attached to the neckline).
- The shaping tag for the base is H: cast on the total number of needles required for the base of the hood (i.e. LN23-RN35), set carriage to hold and put all the needles into hold except the last 4, i.e. RN32-RN35.
Next, pick up (put back into working position) x needles, every 2 rows, as instructed by DesignaKnit and go on knitting, shaping as instructed by DesignaKnit.
- Knit the cuff, transfer the ribber stitches to the main bed and leave on the machine.
- Re-hang the poncho on those needles, wrong side up, placing the shoulder seam at the centre of the cuff. I chose to re-hang 20 cm (10 cm on either side of the shoulder seam) to get some gathers around the cuff.
- Knit one loose row and latch tool bind off.